With the public release of iOS 7 less than a week away (at least at the time of writing), it’s now prime time to get updates of your iOS apps into the App Store so they’re all good on the new hardware.
When it comes to dealing with games built in Unity, you’ll find the biggest issue is simply getting used to the changes which Xcode 5 brings to the table. This guide covers what you’ll need to be aware of in terms of tweaking the Xcode project you get out of Unity to allow it to submit to the store successfully.
Before I delve into everything, there’s a couple of assumptions I will be making (based on how I did things with submitting the Pocket Dogfights update which inspired this):
You’re using Unity 4.2.1 Pro (or later). You need Unity 4.2 to fix some compatibility problems with iOS 7, and the restructuring of the Launch Images which is covered, might cause the check to fail on the Free version of Unity.
You have access to a high quality version of your game’s icon image, as you will need to create a few new versions of this (I’ll cover the necessary resolutions later on).
You’re a member of the iOS development program, and you’ve installed the Xcode 5 GM available from http://developer.apple.com.
To start with, build out the Xcode project for your Unity game - at this point, treat it as normal, and as a release build. Once you have that ready to go open the project up in Xcode, and let’s begin!
Icons
The first thing to update is the icons. Xcode 5 introduces Asset Catalogs to simply managing multiple copies of an image (such as for multiple resolutions). We’ll create one to manage both the Game’s icons, along with the Launch Images.
Open the project settings by selecting the Unity-iPhone project from the Navigator (if that’s not visible, press Command & 0 to open it).

If you’re not familar enough with Xcode, this contains the various configuration items for the project - and has also changed somewhat compared to the project settings in prior versions.
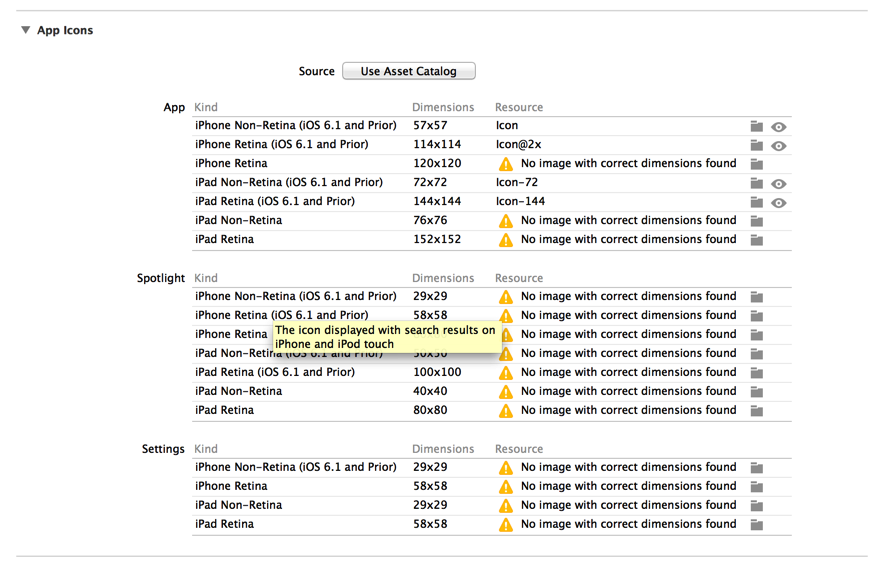
Scroll down to the App Icons section, and you’ll find the various icons listed. In our case, the project Unity generates will only include those pre-iOS 7 sizes (as you specified in your Unity project). Plus, as is the case normally, the Spotlight & Settings icons are not filled out as well. If you do require those, you’ll need to include the right ones (see the Xcode documentation for what you need there).
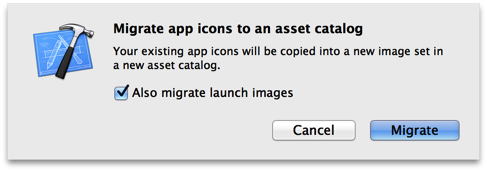
Now, click the Use Asset Catalog button. When confirming the migration, you’re also asked if you wish to migrate the Launch Images (which is iOS talk for the splash screen that appears when starting your app) - you’ll want to ensure this is checked as well.
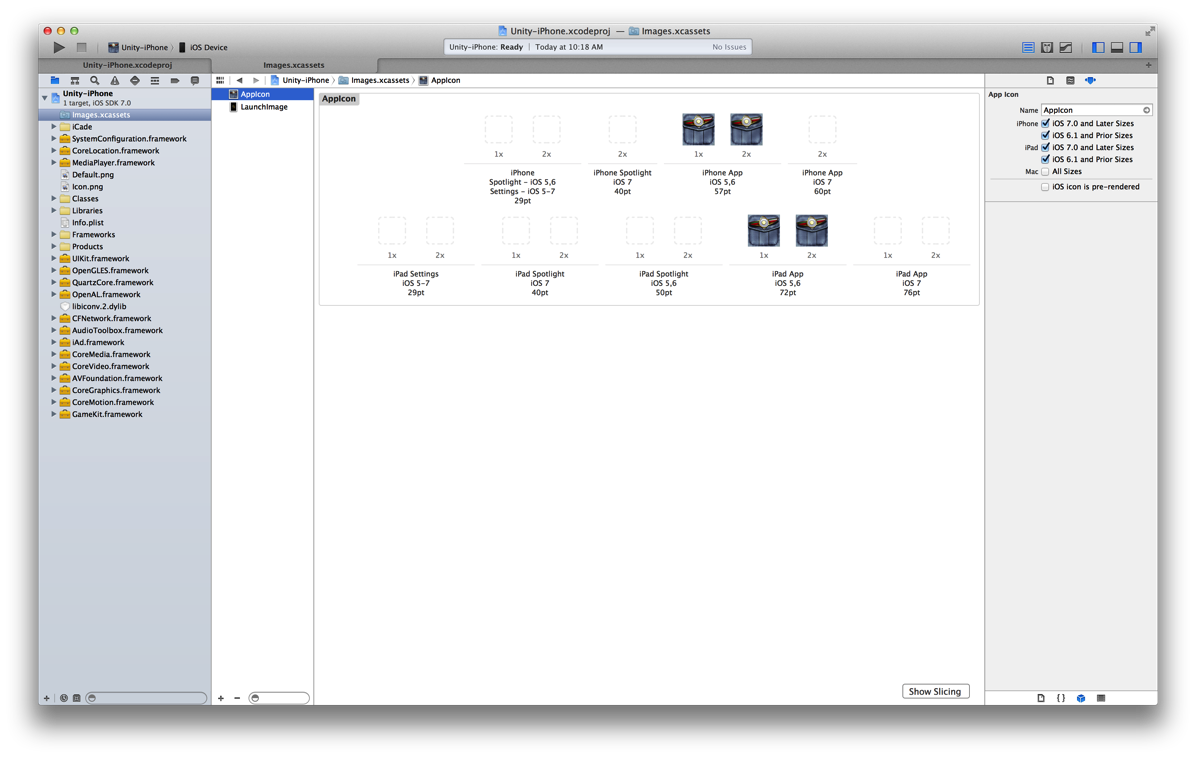
With the migration done, you’ll notice two things - firstly, the creation of a new file named Images.xcassets in the project, and the list of icons is now replaced by a reference to an Asset Catalog.
Open Images.xcassets & then the AppIcon section, as you see in the screen below.
You’ll want to first review the icons which are there (making sure they’re correct for iOS 5/6), and prepare the new iOS 7 icons as follows:
For iPhone, you’ll just need a version at 120x120 pixels - this will be for the Retina iPhones (as iOS 7 doesn’t run on anything prior to the iPhone 4).
For the iPad, you’ll need both a 76x76 pixel icon (to be used for the iPad 2 & iPad mini), along with a 152x152 pixel version for the Retina iPads.
When you have these - just drop them into the appropriate slots in the window, and they’ll be copied to the correct location in your project & be ready to go.
The last thing to worry about is the gloss which was applied to icons in prior iOS versions. Under iOS 7, this is no longer performed, but if your game is going to be released for the older iOS versions, then you need to be aware that setting the Prerendered icon flag inside the Player Settings window in Unity will not be applied here.
Instead, open the Utilities panel by pressing Command + Option + 0, then select the third tab present (the Attributes Inspector), and ensure the iOS icon is pre-rendered flag is checked.
Launch Images
With the icons done, next we need to clean up the launch images.
If you’ve not already added them to the Asset Catalog, then do so (Open the project settings from the navigator, scroll down to the Launch Images section, and click Use Asset Catalog and re-open Images.xcassets).
Unlike the icons, there are no new launch images required - all you’ll need to do here is just grab the images already in place for iOS 5/6, and drag them (whilst holding the Option key) into the matching slot for the iOS 7 version of the image to reuse them.
You can also uncheck any you’re not using from the Attributes Inspector (as I’ve done with the Portrait iPad images in Pocket Dogfights) to hide them from being shown.
The only other thing to note - if you happen to be using a generic default image and you’re planning to be available on iOS 5/6, then make sure you’ve got an original 320x480 pixel image to do in place - Unity generates a forcibly scaled image at build time which looks terrible (relatively speaking ;p).
Updating Info.plist
Now, with all our images taken care of, we need to clean-up Info.plist (which of course contains the configuration for the app) - so open that up from the Navigator.
There are two entries we’ll remove, first off we need to remove the Icon file entry, and then the Icon already includes gloss effects entry.
These fields were the way icons were set back in the early days of iOS, and now we’re using the Asset Catalog to configure them all, they’ll interfere with the new entries which Xcode will add during build time.
Cleaning Up
The last part of the process is just to clean everything else up. The best part about moving the assets into the Asset Catalog, is that they’re copied, not moved - so cleaning up becomes straight forward.
If you explore the project - you’ll find the various icons & launch images as .png files - these can all be safely removed from the project, otherwise, Xcode will continue to include them in the build process and you’ll suddenly find double sets in there.
Also, when you’re ready to start testing - you’ll want to make a backup copy of the Asset Catalog for when you do future releases. If you right click it in the Navigator & select Show in Finder, then you’ll be able to grab that for future use.
So that’s pretty much the process. It’s a bit painful to understand for the first time, and I’m sure if you’re frustrated with the process - it’s best to get in touch with Unity & politely ask them to improve the Xcode project to be up to date with the latest Xcode.
Lastly, if you enjoyed the post, or thought it was helpful - please do share it around, or check out my game Pocket Dogfights - the experience in getting its latest iOS update out (v1.1.2) were what prompted me to put this piece together.